Skin Conductance (SC) analysis: Non Specific Response (NSR)
Introduction
The picture shows12, 15 second long blocks of SC data, recorded in an emotion study. The first 6 blocks are in a baseline phase, when the subject was resting; blocks 7 to 12 are in an active phase while the subject experiences emotional material.
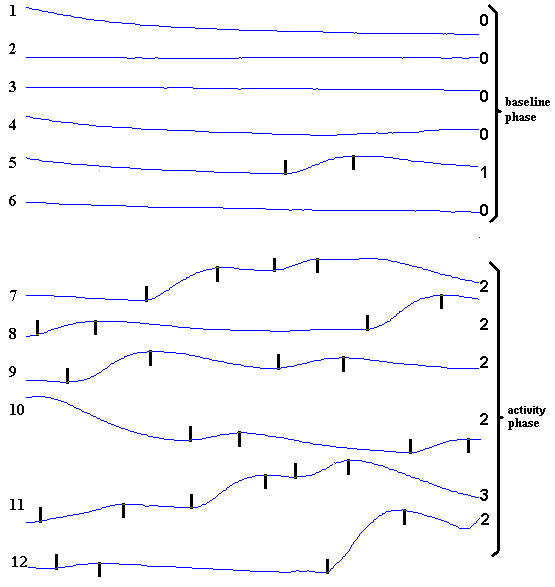
The blocks are automatically processed using PSYLAB's wave function to pick out and count each fluctuation, seen marked with a black dash at the onset and peak. A count of fluctuations is obtained for each block. These data are produced in a table of results which may be directly exported as a text file:
1 653 1 0
2 653 1 0
3 653 1 0
4 653 1 0
5 653 1 1
6 653 1 0
7 653 2 2
8 653 2 2
9 653 2 2
10 653 2 2
11 653 2 3
12 653 2 2
Each line contains 3 items of 'header information', and the last number on each line is the count of SCRs for that block. The header information in this example is 'block number', 'subject number', 'event category'. The event category indicated which 'phase' of the experiment the block relates to. In this case, event type 1 is baseline, event type 2 is the emotional phase. There can be numerous different types of such phases. The rest of this document describes in detail how PSYLAB analysis software can be used to produce these results.
Summary
Data were recorded in the 'general' experiment to study physiological variations during different stages which were indicated by pressing function keys on the computer keyboard at the beginning of each stage during on-line measurement.
The analysis demonstrated here created 10, 30 second time epochs (blocks) the first of which began at the occurrence of an event mark. The number of time epochs after each event mark was set to 10 (total 5 minutes of analysed data after each event), but this could easily have been changed. Spontaneous SC fluctuations (NSR) were automatically detected using the WAVE detection algorithm and their number counted in each time epoch.
Measurement program used to make this record
Details of the WAVE algorithm
The count of NSRs, and the total amplitude of all these NSRs added together in each block, was expressed on each line of a table of results, so that one line represented each 30 second period. Other information, such as the subject number and the category of each event (which key was pressed to indicate the event) was included in every line of the results table. This produced a disk text file of user-defined format suitable for direct import to spreadsheet or statistical analysis programs to permit comparison and grouping of results across subjects. The entire analysis process was registered as a macro program which allowed subsequent records to be automatically analysed in the same way.
The analysis structure demonstrated here could be modified for other measurement models (e.g. experiments in which stimuli are automatically generated, rather than manually indicated). The main differences to the analysis procedure would lie in the way in which data are originally separated into blocks. The minimum inter-stimulus-interval (ISI) might be less than the period of data analysed in this example for each event (10 x 30 seconds), which would require either shorter block width (30 seconds), or less blocks following each event (10).
Preamble
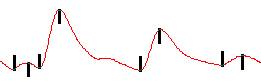
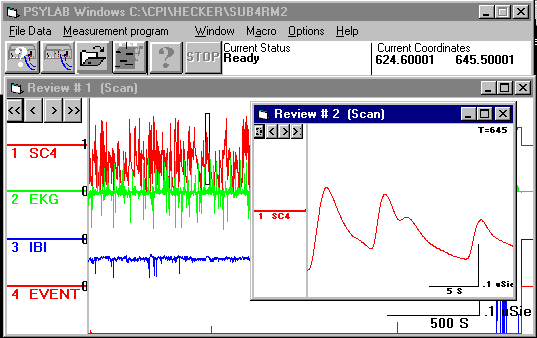
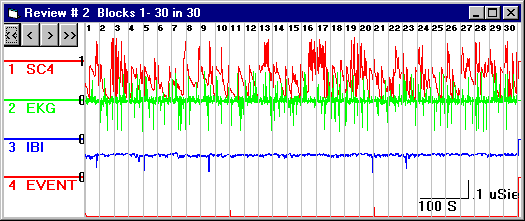
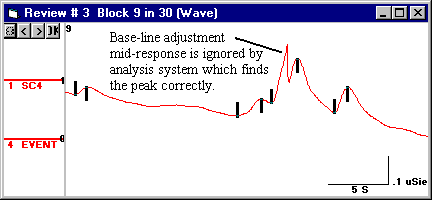
The record used here to demonstrate Skin Conductance analysis was generated in a study in which there were baseline and various 'active' stages. Each stage was designated by pressing a function key. These events can be seen as blips in the lower red channel. A typical entire recording is shown below, with a small section Zoomed in upon (by drawing a rectangle round the required section - holding down the right mouse button and dragging from the top left - then double clicking the left mouse button in the body of the Review and selecting Zoom in). In that section, the expanded SC trace clearly shows typical spontaneous fluctuations (NSR) which vary in amplitude from perhaps 0.05 uS (micro Siemen) to 0.5 uS. A typical Skin Conductance response (either NSR or SR) has a duration of several seconds from onset to peak.
Measurement program used to make this record
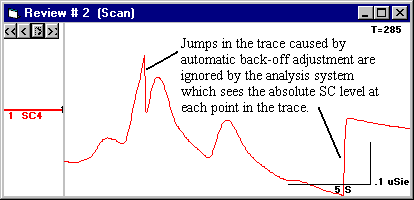
At various points in the SC record, the trace may be seen to jump abruptly. This is caused by the automatic back-off system, which ensures that a suitable base-line suppression level is set so that the response trace remains within the boundaries of the scale range. All analysis of SC data is done using a computed absolute SCL value for each data point, which is a combination of the back-off level and the response trace. The analysis system therefore does not 'see' the jumps in the trace, and is capable of correctly evaluating the amplitude of each SCR, even though the response includes one or more back-off jumps.
However, at the time when the record is made, the scale control of the SC measurement coupler should be set to a high enough value that the back-off system is not frequently re-adjusted, otherwise the trace is difficult to see, and small errors in the accuracy of the back-off system may become an interference. Generally the scale setting of 1.6 uS is low enough to avoid frequent back-off changes, but sensitive enough to allow low level responses (<0.2 uSiemen) to be evaluated.
PSYLAB7, released in fall of 1997, allows blocks to be generated during measurement, removing the need to select blocks from a continuous record in the analysis stage. In this case, the first Review will be the multi-block Review, opened using Toolbar menu, File Data, Open block data for analysis. and subsequent Reviews would be numbered one less than those in the example. In the macro: 'OpenRawData' would be replaced with 'Open Block Data', 'Review#1:SetBlocks@' would be removed and subsequent Review# references would all be numbered by 1 less (e.g Review#2,Process@C:\CPI\SMITH3.PRO becomes Review#1,Process@C:\CPI\SMITH3.PRO).
Method
PSYLAB windows software was operated manually with 'macro record' switched on to record each function used in analysis of a typical data record so that subsequent records could then be automatically analysed by simply running the macro. Each stage in the manual analysis generated a line of macro code which could be seen in the Macro window. If a mistake was made while manually performing the original analysis, incorrect lines in the macro window could be directly edited.
The computer was configured to run Windows 3.1, Windows 95 or Windows NT4 with a screen resolution of at least 600x800 to allow sufficient screen area for the different windows which PSYLAB would create. PSYLAB was started so that the toolbar was seen. It was positioned at the top left of the screen.

The macro window was opened by clicking on the fourth button on the toolbar. It was positioned at the bottom right of the screen. 'Record' in the macro window was clicked to activate record mode. The third button on the toolbar, 'open data', was then clicked and a raw data file was selected from the file selection panel. This caused the first line ' OpenRawData' to be generated in the macro window.
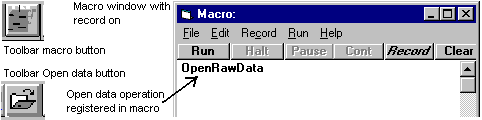
At this point, if the macro was run this line would automatically present the raw data file selection panel to the operator prompting them to choose an experiment record, which is the first step of the analysis. (The first line in the macro could alternatively have been created by selecting Toolbar menu, File Data, Batch open data, generating an line like ' OpenRawData@FILENAME.BCH'. This would have allowed raw data records to be read in from a list of file names, so that a batch of records could be processed without operator intervention).
Opening raw data caused the entire record to be seen in Review#1. The amount of detail seen in this Review was dependent upon the setting found in Toolbar menu, Options, Initial display density setting. In the example data shown here, this density was set at 2500, meaning that the Review resolved the time scale into 2500 parts. At this density, it was just possible to see the brief events in the bottom channel. Density was purely a visual concern - the system would find these events whether they could be seen or not.
With raw data showing in Review#1, the mouse pointer was positioned on the body of this Review and the left button double-clicked to obtain the Review menu. Set blocks was selected, causing the Block selection panel to appear.
Block settings chosen were:
Set block time width: 30
Set pre-event interval: 0
Set event levels to detect: 1 to 255
Set number of blocks per event: 10
The system automatically selected the event channel at channel 4, which was the correct channel. This may have needed to be manually adjusted if there were more than one event channels in the record. 'Detect events on onset' of event was checked, the other three options were not checked.
The settings were then saved to file, using File, Save settings as. from the Block selection panel menu. The file name used in this example was SMITH1. PSYLAB automatically added the extension .BLO
The 'View blocks' button on the Block selection panel was then clicked, causing PSYLAB to scan through the record looking at every point in the event channel to detect changes where the level encountered was within the range 1 to 255. PSYLAB then created a new Review#2, which contained multiple blocks (10 blocks for each of the 3 event markers, a total of 30 blocks). This also caused the line ' SetBlocks@C:\CPI\SMITH1.BLO' to be registered in the macro window, which would allow an identical block pattern to be created when the macro was subsequently used to automatically process other similar records.
The process channel indicators to the left of each channel were then set so that only the SC channel (1) was selected (0 = not selected, 1 = selected). The Review menu was then obtained on the multi-block Review (by double clicking in the body of the Review). Process, Set Parameters. was selected. This opened the Process settings window. The panel of interest in this case was 'Select Wave Parameters'.

Settings chosen were:
Set: WAVE Parameters 3, 3, 3, 2%
Set: Compression x2 (for data recorded @ rate 20 per second
Select: Only wave totals
Check: Show zeros if no wave
Check: Allow onset at block start
These settings provided 3 data points to establish each aspect of the WAVE (onset, slope, peak). This was enough to avoid accidental detection of noise or movement artefact in the SC trace, yet not so stringent as to disallow WAVEs because noise or artefact distorted these aspects. WAVE detection is optimal for SC data sampled at 10 per second - as a result of the time constant of average SC waves. For this reason compression was set at 2, so that every other point would be ignored.
'Only wave totals' was selected, because a count of waves in the given time epochs was required, rather than information on each individual wave. By checking 'show zeros if no wave', it was ensured that for every block, some information would go into the results table, even if it was zeros for no responses (otherwise empty fields would disrupt results table format). 'Allow onset at block start' was checked so that a WAVE which was incomplete at the beginning of the block would be scored. When analysing specific responses (SR), this would be undesirable as a valid response would be defined as having its onset in a given time window relative to the event, but with NSR analysis, it is important to count all the waves in the given time epoch, and one which is incomplete because of the block division should be included.
Data analysed with the above WAVE settings.
These settings were saved using File, Save process settings as. in the Process Settings window menu. File name SMITH3.PRO was used (the extension .PRO was added automatically). The Process Settings window was then closed. This caused the line: Review#2, Process@C:\CPI\SMITH3.PRO to be registered in the macro, which would allow identical Process Settings and channel selection to be loaded when the macro was subsequently used to automatically process other similar records.
The Review menu was again obtained on the multi-block Review (by double clicking in the body of the Review). Process, Mean. was selected. This caused Review#3 to be produced, showing the first block of 30 in full detail, with only the selected SC channel showing (the event channel may also have shown, if this was selected on the Process Settings panel, but it would not have been activated (not selected as 1) and therefore it would have been ignored by processing functions). This caused the line: Review#2, 76 ' wave to be registered in the macro, the line which would allow it to automatically open the WAVE processing Review, using the settings defined in SMITH3.PRO. At this point the macro being recorded appeared as follows:
OpenRawData
Review#1,SetBlocks@C:\CPI\SMITH2.BLO
Review#2,Process@C:\CPI\SMITH3.PRO
Review#2, 76 ' wave
The 'OK' button on Review#3 was then clicked. This caused the panel 'Set up Output for WAVE function' to appear in the Results window. The Results window was suitably re-positioned and re-sized by the operator to allow clear view of this panel.
Items checked in the 'Set up Output for Wave function' panel were:
Block number
Subject number
Event value
Total of All Wave Amplitudes
Total Count of all Waves
Terminate line between blocks
Buttons 2, 5 and 6 were clicked in correct sequence. At this point the system prompted for a name to store the Results Format Program. The name Smith3 was entered - extension .RFP was automatically added. The RFP created was as follows:
select by review#
HEADER
output ' terminate last line
output blockoutput subject
output event
return
REVIEW#3
if block > b1 then gosub HEADER ' new line between blocks
c1 = channel ' put channel no into variable c1
b1 = block ' put block no into variable b1
output dat4(c1) ' accumulated amplitude
output dat5(c1) ' wave count
end
This code is more complicated than it need be to produce the data selected in this instance. For example, the line 'c1 = channel' is not required, it would only be used if 'Channel number' had been selected in the 'Select Output for Wave function' selection panel, or if . This method of automatically generating the RFP produced redundant code, as it has to be able to accommodate a variety of different selections, but the code it generated did produce the correct results.
The RFP code could have been tidied up, or completely re-written, by manually editing the program, and indeed much more sophisticated manipulation of results files would have been possible by manually creating the RFP with reference to the RFP language.
The system then prompted: 'Now click OK on Review#3 again'. The reason for this prompt was that when the OK button on Review#3 was first clicked, the system tried to run an RFP but found that none had been loaded. It therefore went through the procedure of presenting the 'Select Output for WAVE function' panel so that an RFP would be created. After that was completed, it required that the newly generated RFP be run, so it prompted the user to again click on the OK button of Review#3.
With the bottom of the Results window position at the bottom of the screen area, its height was now reduced so that it did not obscure Review#3. The Results window was also widened to occupy full screen width so that long lines of data might be viewed.
The OK button of Review#3 was clicked as had been prompted. A line of numbers appeared in the Results window. These numbers were: Block number, Subject number, Event category (function key * 10), Total amplitude of all Waves in that block, Count of number of waves in the block.
1 0 10 .4539986 2
The > button was clicked on Review#3, to move on to the next block, and the OK button was clicked again. Another line of data appeared in the Results window. At this point, the macro that showed in the macro window appeared as follows:
OpenRawData
Review#1,SetBlocks@C:\CPI\SMITH2.BLO
Review#2,Process@C:\CPI\SMITH3.PRO
Review#2, 76 ' wave
ShowResults@C:\CPI\SMITH3.RFP
Review#3, 51 ' button 4 OK
Review#3, 53 ' button 3 >
Review#3, 51 ' button 4 OK
The Record button of the macro window was clicked to turn off Macro Record. The macro was then manually edited so that it appeared as follows:
OpenRawData
Review#1,SetBlocks@C:\CPI\SMITH2.BLO
Review#2,Process@C:\CPI\SMITH3.PRO
Review#2, 76 ' wave
ShowResults@C:\CPI\SMITH3.RFP
Review#3, 51 ' button 4 OK
for
Review#3, 53 ' button 3 >
Review#3, 51 ' button 4 OK
next
These two instructions, for and next, had the effect that the lines between them would be repeated until the last block was encountered. The Macro was now saved in the name SMITH3 using File, Save macro as. in the macro window. The extension .MAC was automatically added. The Run button in the macro window was now clicked, to test out complete operation of the macro.
All of the Reviews that had been created while recording the macro were automatically closed, and the first macro instruction caused the 'Load data for analysis' panel to appear. The same raw data file that had been used to originally generate the macro was loaded, to test macro operation. Each of the analysis stages was automatically performed, producing the following results for the 30 block record:
1 0 10 .4539986 2 2 0 10 1.277996 6 3 0 10 1.550003 7 4 0 10 .3560009 4 5 0 10 .2640018 3 6 0 10 .2899971 4 7 0 10 .6019974 6 8 0 10 .302002 3 9 0 10 .6080017 4 10 0 10 .2559986 2 11 0 20 0 0 12 0 20 2.799988E-02 1 13 0 20 1.458 6 14 0 20 .2159996 2 15 0 20 9.799767E-02 3 16 0 20 1.421997 5 17 0 20 1.422001 7 18 0 20 4.999924E-02 1 19 0 20 1.718 3 20 0 20 1.028002 5 21 0 30 .1399994 4 22 0 30 .6439972 7 23 0 30 .4020004 5 24 0 30 1.064003 5 25 0 30 5.400085E-02 3 26 0 30 .4780025 5 27 0 30 .4199963 5 28 0 30 .6819992 4 29 0 30 .472002 3 30 0 30 2.237997 6
The results were then saved to disk file using File, Save results. in the results window. At this point the position of all the windows could have been permanently saved if wished by clicking Toolbar menu, File data, Save settings now. It was not recommended to use the Save settings on exit. option. PSYLAB could now be terminated, or further records automatically processed by running the macro and loading in other raw data.