Reaction Time
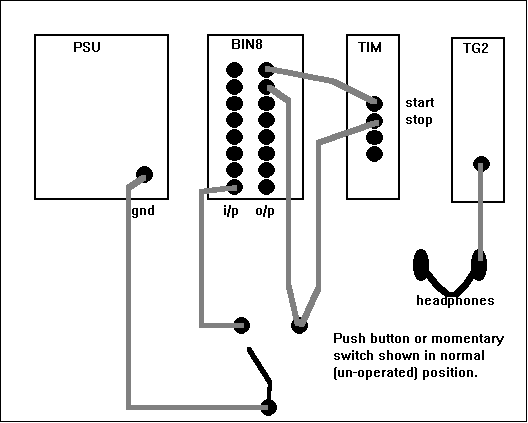
Reaction time may be measured to an accuracy of 1mS without the need for high speed data sampling by using the Start and Stop inputs of the Interval Timer. When plugs are inserted into these inputs, the internally generated trigger, which is normally used for measuring periodic intervals in waveforms (e.g. measuring I.B.I. from the Pulse waveform), is automatically disabled.
A low signal on the start input sets the Interval Timer counter to zero; otherwise it will count up once every milli-second. A low signal on the stop input causes the output register to freeze. Otherwise it will show the counter value. This is only true however if the I/Cs on the Timer circuit board which register the counter value are 'transparent latch' I/Cs.
Normally the Interval Timer is supplied with 'edge triggered' latches, which cause the registers to update only at the time that a change occurs on the Stop input, or as a result of the internal waveform triggering system causing such a change. This means that when measuring I.B.I for example, the output of the timer jumps from one timed value to the next. The edge triggered I/Cs used for this are the 74LS374.
If these chips are changed for pin compatible 'transparent latch' 74LS373, the output will continously register the counter value while it increases while the 'stop' input is high. This is more convenient for reaction time measurement.
To do reaction timing, we first set the counter to zero by applying a low to the 'start' input and at the same time we produce the reaction time 'cue', in this case a tone. We allow the counter to increase until the subject responds by pressing a button (or some other thing which has the same electrical effect).
During this period we see the timer value increase. When the button is pressed, it causes a low on the 'stop' input and the timer value is frozen. However, we cannot rely on the subject holding the switch closed, so immediately we detect a switch press we set an output of the BIN8 low, which is connected to the stop input in parallel with the switch.
This has the effect of holding the Timer latch so that the readout remains between trials, and the reading can thus easily be used in a processing routine to produce reaction time values.
The wiring and PCC program used to get this effect are slightly complicated, particularly because: a) The signal used to indicate that the switch has been pressed must be separate from the switch signal used to 'stop' the timer, otherwise it will seem as though the switch never gets released; b) The polarity of the BIN8 default states and required Timer input signals do not happily correspond.
There will be variations on this set-up, which may be employed for slightly different situations, but this method provides a useful starting point which may be implemented by simply following the circuit and copying the program. Other measures (physiology) may be included by simply adding $measure lines at the top of the program.
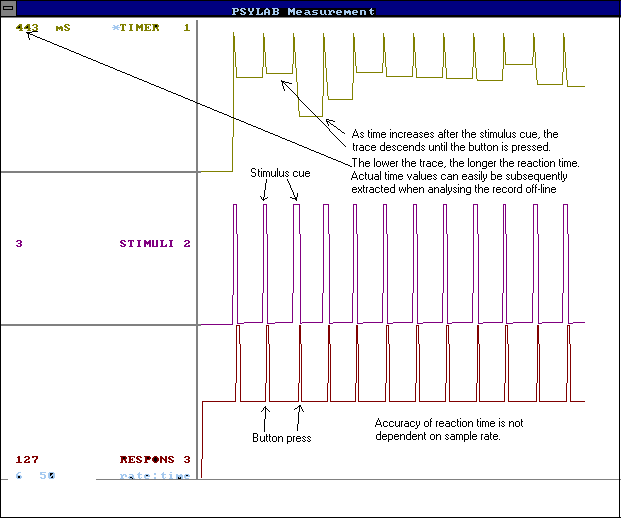
Screen seen as reaction time measurement takes place